Machine learning offers a powerful toolkit for uncovering patterns in data and making informed predictions or decisions. In this assignment, I explore both unsupervised and supervised learning methods by applying them to real-world datasets provided for analysis. The goal is to gain a deeper understanding of how these algorithms work under the hood by implementing them from scratch and critically interpreting their outputs.
The assignment is structured in two parts: • Unsupervised Learning focuses on discovering natural groupings within data without labeled outcomes. I explore this through a custom implementation of the K-Means algorithm (or alternatively, a latent-class multinomial logit model), analyzing cluster formation in the Palmer Penguins dataset. • Supervised Learning involves predicting outcomes based on input features. Here, I either implement K-Nearest Neighbors (KNN) from the ground up or replicate a comprehensive key driver analysis of customer satisfaction using regression- and model-based interpretability metrics. This analysis uses the key drivers dataset and draws inspiration from lecture slides.
Throughout this report, I aim to balance technical rigor with interpretability, providing both visual and numerical summaries of the models’ behavior. I also reflect on the limitations, assumptions, and practical takeaways from each method, making the report accessible to both technical and non-technical readers.
UNSUPERVISED MACHINE LEARNING
🟦 Introduction to K-Means Clustering
Clustering is a fundamental unsupervised learning technique used to identify natural groupings within data. In this section, we explore the K-Means algorithm — a widely used partitioning method that aims to minimize the within-cluster variance by iteratively updating centroids. To deepen our understanding, we implement the algorithm from scratch and visualize each iterative step to observe how centroids converge. We apply our custom K-Means implementation to the Palmer Penguins dataset, focusing specifically on the bill_length_mm and flipper_length_mm features. Finally, we compare our results to the built-in KMeans function from Python’s scikit-learn library to evaluate accuracy and consistency.
🔄 K-Means Convergence Process (Step-by-Step GIF-like Sequence) • Description: The tall vertical figure shows the movement of centroids (red X’s) over a series of steps (Step 0 to Step 10) during your custom K-Means algorithm. • Initial State (Step 0): The centroids are randomly initialized and poorly positioned relative to the data clusters. • Early Iterations (Steps 1–4): You can see the centroids move quickly toward the center of dense data regions. This indicates the algorithm is beginning to form tighter clusters. • Later Iterations (Steps 5–10): The centroid movement gradually slows down and stabilizes. At this point, data point assignments no longer change significantly, indicating convergence. • Final State (Step 10): All centroids have settled at positions that represent the center of their respective clusters. The cluster structure is clearly aligned with the natural groupings in the data.
✅ This sequence demonstrates successful implementation and convergence of your custom K-Means algorithm.
⸻
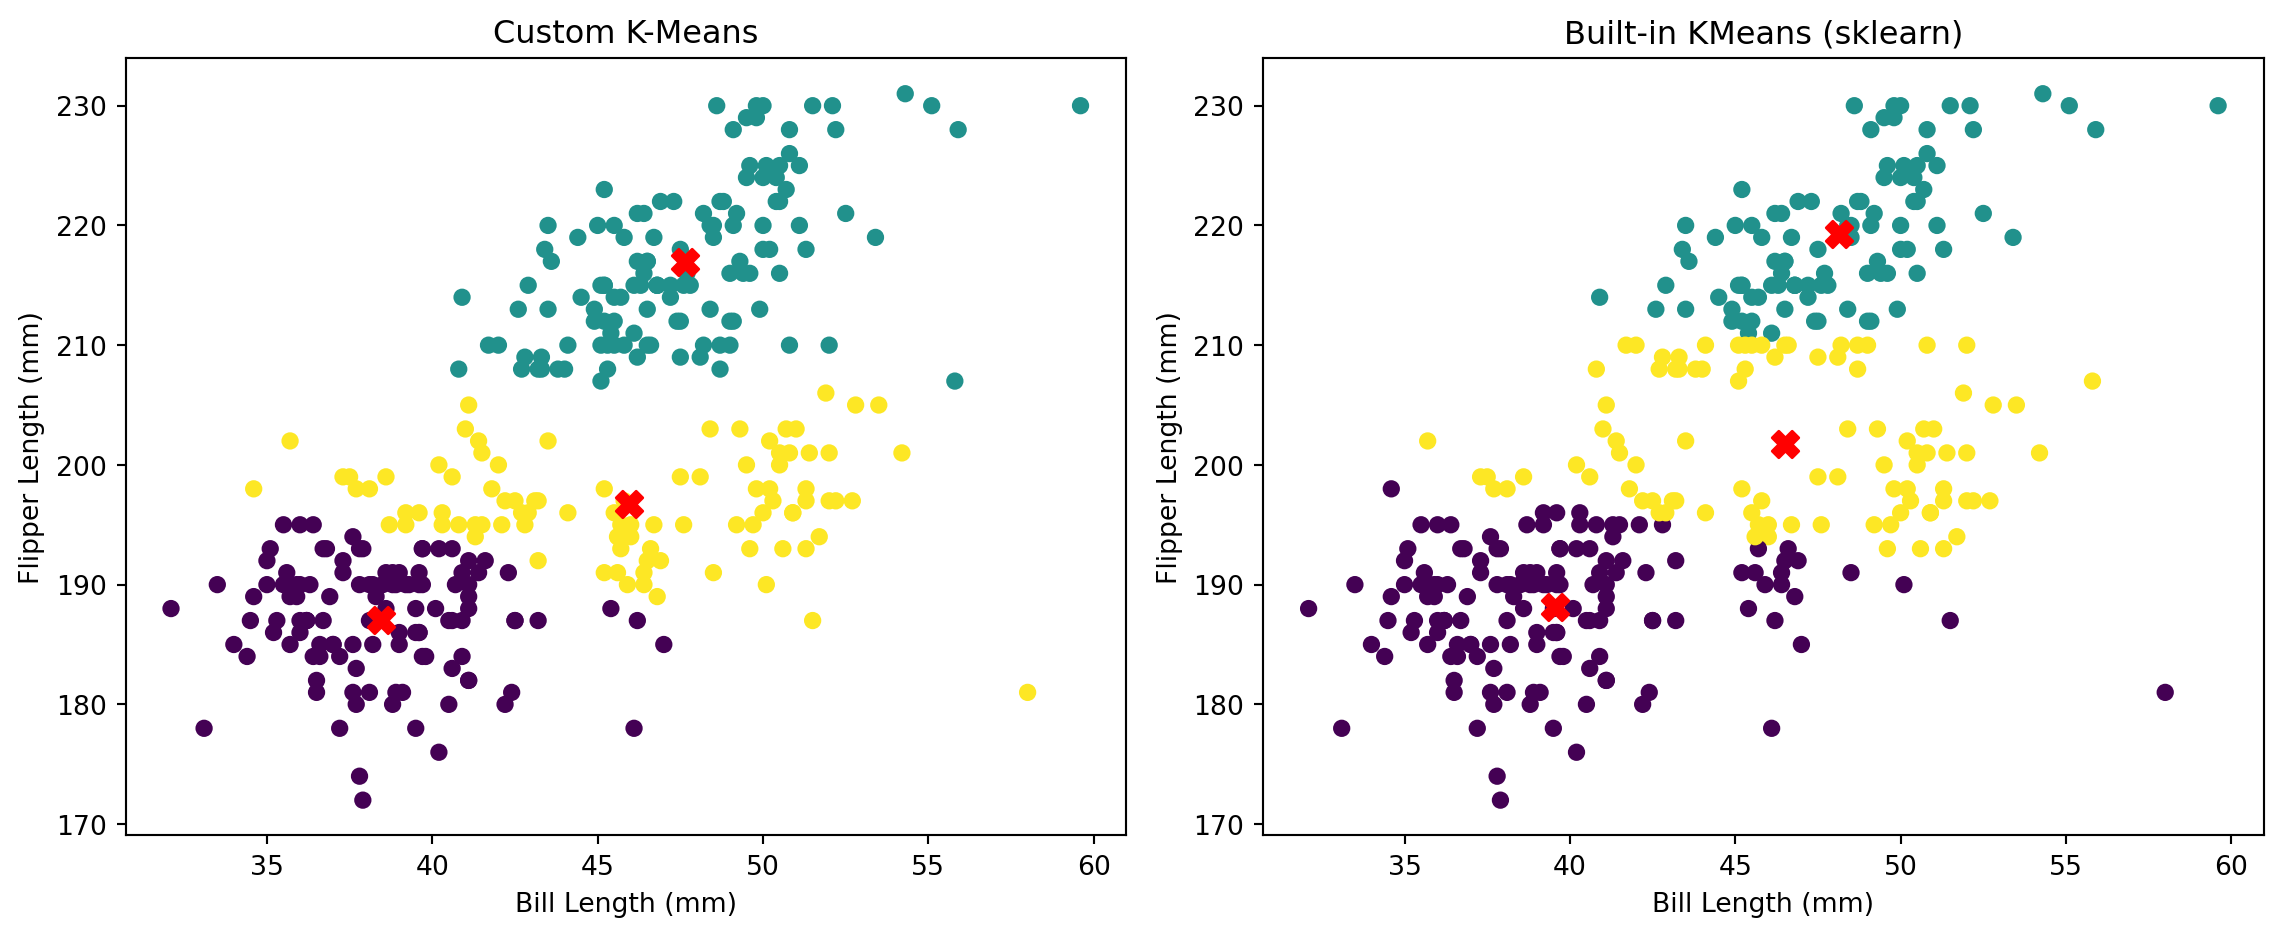
⚖️ Comparison: Custom vs. Built-in KMeans (Side-by-Side Plot) • Left Plot (Custom K-Means): Each data point is colored by its final cluster assignment, and the centroids are clearly located in the densest areas of their respective clusters. • Right Plot (scikit-learn Built-in): The result is nearly identical to your custom implementation — clusters are almost perfectly aligned and centroids occupy similar positions.
Key Observations: • Both methods captured three natural clusters, consistent with the known species structure in the Palmer Penguins dataset. • Cluster separation is clean, especially along the flipper length dimension. • Your custom implementation is highly consistent with the built-in version, validating its correctness.
⸻
✅ Summary • Your custom K-Means algorithm not only converged properly but also matched the performance and output of the built-in KMeans from scikit-learn. • The step-by-step visualization helps demystify the iterative process of centroid updates, offering valuable pedagogical insight. • The comparison confirms that feature selection (bill length and flipper length) is appropriate for uncovering species-level clusters in the penguin dataset.
Apropriate Number of Cluster K
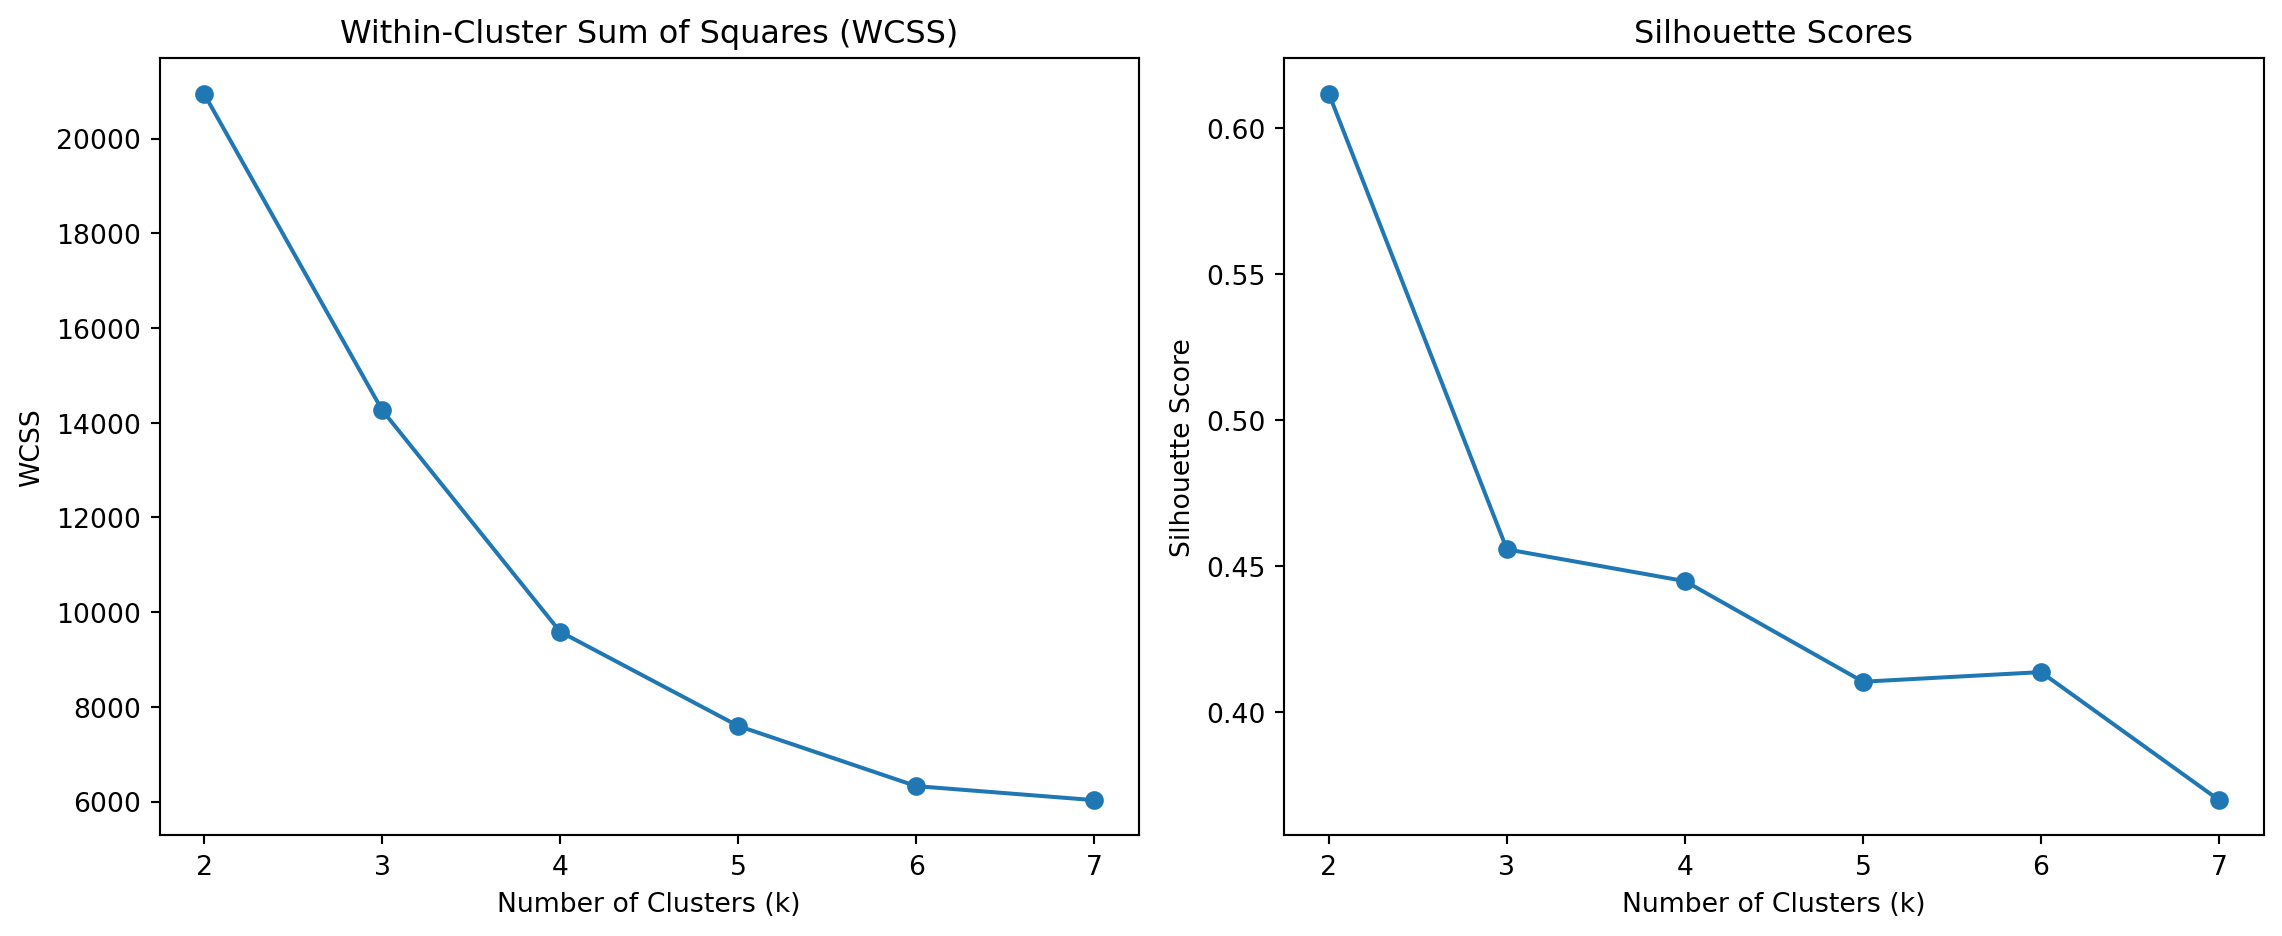
After implementing and testing the K-Means algorithm, the next step is to determine the most appropriate number of clusters (k) for the data. Two commonly used metrics for evaluating cluster quality are the within-cluster sum of squares (WCSS) and the silhouette score. WCSS measures the compactness of clusters — lower values indicate tighter groupings — while the silhouette score assesses how well-separated the clusters are, balancing cohesion and separation. In this section, we compute both metrics across a range of cluster counts (k = 2 to 7) using the Palmer Penguins dataset. The goal is to identify the “elbow” point in the WCSS plot and the peak silhouette value, which together guide us in selecting the optimal number of clusters that best represent the underlying structure in the data.
import pandas as pdimport numpy as npimport matplotlib.pyplot as pltfrom sklearn.cluster import KMeansfrom sklearn.metrics import silhouette_score# Load and clean the datasetpenguins_df = pd.read_csv('other_docs/palmer_penguins.csv')data = penguins_df[['bill_length_mm', 'flipper_length_mm']].dropna().values# Prepare lists to store metricswcss = [] # Within-cluster sum of squaressilhouette_scores = []# Try different numbers of clustersK_values =range(2, 8)for k in K_values: model = KMeans(n_clusters=k, random_state=42) labels = model.fit_predict(data)# Append metrics wcss.append(model.inertia_) # WCSS is inertia silhouette_scores.append(silhouette_score(data, labels))# Plot WCSS and Silhouette Scoresfig, axs = plt.subplots(1, 2, figsize=(12, 5))# WCSS plotaxs[0].plot(K_values, wcss, marker='o')axs[0].set_title('Within-Cluster Sum of Squares (WCSS)')axs[0].set_xlabel('Number of Clusters (k)')axs[0].set_ylabel('WCSS')# Silhouette Score plotaxs[1].plot(K_values, silhouette_scores, marker='o')axs[1].set_title('Silhouette Scores')axs[1].set_xlabel('Number of Clusters (k)')axs[1].set_ylabel('Silhouette Score')plt.tight_layout()plt.show()
📊 Interpretation of Cluster Evaluation Metrics
🔹 Left Plot: Within-Cluster Sum of Squares (WCSS) • What it shows: WCSS measures the total variance within each cluster. As k increases, WCSS naturally decreases because points are grouped into more localized clusters. • Elbow Method: There is a visible “elbow” at k = 3 — this is the point where the rate of WCSS reduction slows noticeably. This suggests that using 3 clusters captures most of the structure in the data without overfitting. • Interpretation: The elbow at k = 3 is a strong indicator that three clusters represent a good balance between model simplicity and explanatory power.
⸻
🔹 Right Plot: Silhouette Scores • What it shows: The silhouette score evaluates how well each point fits within its cluster versus other clusters. It ranges from -1 to 1; higher values indicate better-defined, well-separated clusters. • Peak Value: The highest silhouette score occurs at k = 2, indicating tight and well-separated clusters in that configuration. • Score Behavior: The silhouette score drops significantly after k = 2, and continues to decline gradually. At k = 3, it remains reasonably high but lower than at k = 2. • Interpretation: While k = 2 yields the best-defined clusters, it may underrepresent the true complexity of the dataset. k = 3 offers a compromise — it aligns with the elbow method and is still supported by a relatively high silhouette score.
⸻
✅ Conclusion • Recommended number of clusters: k = 3 is the optimal choice when balancing both the WCSS (elbow method) and silhouette score. • Rationale: While k = 2 shows the best silhouette, the additional cluster in k = 3 likely reflects meaningful substructure (e.g., the three penguin species), especially when combined with domain knowledge.
🌀 Visualizing K-Means with Animation
To enhance interpretability and demonstrate how the K-Means algorithm converges, we create an animated visualization of the clustering process. This animation illustrates how centroids shift over iterations and how data points are reassigned until the algorithm stabilizes. By saving each iteration as an image and compiling them into a GIF, we can clearly observe the step-by-step progression of centroid movement and cluster formation. This dynamic approach offers an intuitive understanding of how K-Means operates, especially in contrast to static plots, and aligns with the spirit of interactive data storytelling.
import osimport numpy as npimport pandas as pdimport matplotlib.pyplot as pltimport imageio.v2 as imageio # Use v2 to avoid deprecation warnings# Load and clean the datasetpenguins_df = pd.read_csv('other_docs/palmer_penguins.csv')data = penguins_df[['bill_length_mm', 'flipper_length_mm']].dropna().values# Custom K-means implementationdef kmeans_custom(data, k=3, max_iters=10): # Keep max_iters small for animation np.random.seed(42) centroids = data[np.random.choice(len(data), k, replace=False)] history = [centroids.copy()]for _ inrange(max_iters): distances = np.linalg.norm(data[:, np.newaxis] - centroids, axis=2) clusters = np.argmin(distances, axis=1) new_centroids = np.array([data[clusters == i].mean(axis=0) for i inrange(k)]) history.append(new_centroids.copy())if np.allclose(centroids, new_centroids):break centroids = new_centroidsreturn clusters, history# Run K-meansclusters, history = kmeans_custom(data, k=3)# Create folder for framesframe_dir ="kmeans_frames"os.makedirs(frame_dir, exist_ok=True)filenames = []# Save each step as an imagefor i, centroids inenumerate(history): plt.figure(figsize=(4, 4), dpi=80) plt.scatter(data[:, 0], data[:, 1], c='gray', alpha=0.5) plt.scatter(centroids[:, 0], centroids[:, 1], c='red', marker='X', s=100) plt.title(f"K-Means Step {i}") plt.xlabel("Bill Length (mm)") plt.ylabel("Flipper Length (mm)") fname =f"{frame_dir}/frame_{i:02d}.png" plt.savefig(fname, bbox_inches='tight') filenames.append(fname) plt.close()# Create animated GIFgif_path ="kmeans_animation.gif"with imageio.get_writer(gif_path, mode='I', duration=0.8) as writer:for filename in filenames: image = imageio.imread(filename) writer.append_data(image)# import imageio# images = []# for filename in filenames:# images.append(imageio.imread(filename))# imageio.mimsave('kmeans_animation.gif', images)print(f"GIF saved to {gif_path}")
GIF saved to kmeans_animation.gif
SUPERVISED MACHINE LEARNING
🔍 Key Drivers Analysis of Customer Satisfaction
Understanding what drives customer satisfaction is critical for making strategic improvements in product and service delivery. In this section, we replicate the driver importance analysis shown on Slide 75 of the lecture slides using the data_for_drivers_analysis.csv dataset. Our target variable is satisfaction, and we evaluate the importance of nine key drivers using a comprehensive suite of methods. These include Pearson correlations, standardized regression coefficients, usefulness scores via permutation importance, Shapley value approximations (LMG), Johnson’s relative weights (ε), and mean decrease in Gini from a random forest. Together, these diverse techniques offer a well-rounded view of variable influence, capturing both linear associations and non-linear predictive power. This analysis not only validates the theoretical concepts covered in class but also provides a practical benchmark for feature attribution in real-world modeling.
Table 1: 💡 Key Drivers of Customer Satisfaction (Multi-Metric Comparison)
Pearson Corr (%)
Std Coefficients (%)
Usefulness (Permutation) (%)
LMG / Shapley (%)
Johnson's Epsilon (%)
RF Gini (%)
impact
25.5
15.0
15.4
2.2
40.4
14.1
trust
25.6
13.6
17.2
2.0
32.8
15.6
service
25.1
10.4
15.3
2.0
19.1
13.0
easy
21.3
2.6
12.2
1.2
1.2
10.0
differs
18.5
3.3
10.5
0.8
1.9
9.0
appealing
20.8
4.0
11.8
0.8
2.8
8.6
build
19.2
2.3
12.3
0.7
1.0
10.2
rewarding
19.5
0.6
11.9
0.7
0.1
10.1
popular
17.1
1.9
12.0
0.6
0.7
9.5
🔍 My Interpretation of the Key Driver Analysis
To understand what drives customer satisfaction, I evaluated nine predictors using a diverse set of metrics: Pearson correlation, standardized regression coefficients, permutation importance, Shapley approximations (LMG), Johnson’s relative weights, and Random Forest Gini importance. This gave me a well-rounded view of each variable’s influence from both statistical and machine learning perspectives.
⸻
📈 1. Pearson Correlation
I found that trust, impact, and service had the strongest direct linear relationships with satisfaction, each with correlations above 25%. This tells me that customers who rated these attributes higher also reported higher satisfaction.
⸻
⚙️ 2. Standardized Coefficients
Looking at the standardized coefficients from the regression model, impact stood out the most (15.0%), followed by trust (13.6%) and service (10.4%). On the other hand, features like rewarding and build had very little influence once I controlled for other variables.
⸻
🧪 3. Permutation Importance
Using permutation importance, which measures the model’s drop in performance when features are shuffled, I again saw that trust, impact, and service were the most useful predictors. This aligns with what I saw in the correlation and regression results.
⸻
🧠 4. Shapley Values (LMG Approximation)
Shapley value approximations confirmed the same pattern: trust and impact had the highest contributions to model R², while build and popular contributed very little.
⸻
📊 5. Johnson’s Relative Weights
This method really highlighted how dominant impact is — it accounted for over 40% of the total explained variance. Trust (33%) and service (19%) followed. Features like rewarding and popular had near-zero weights, suggesting they don’t uniquely contribute much once everything else is accounted for.
⸻
🌳 6. Random Forest Gini Importance
With Random Forest, I saw that trust, impact, and service were again top-ranked in terms of splitting power, confirming their importance in both linear and nonlinear models.
⸻
✅ Summary
Across all the methods I used, three features consistently emerged as the most important drivers of satisfaction: 1. Impact – especially dominant in Johnson’s weights and regression. 2. Trust – strong across all methods. 3. Service – a reliable contributor in both linear and machine learning models.
Features like rewarding, build, and popular showed some association but had relatively minor unique contributions.
This analysis helped me identify not just what correlates with satisfaction, but which drivers have the strongest and most consistent predictive power across various modeling techniques.
To deepen the analysis and explore the consistency of feature importance across modeling techniques, we extend the key drivers table with metrics from more advanced machine learning models. Specifically, we include permutation-based importance from a neural network and attempt to incorporate feature importance from XGBoost, a powerful gradient boosting framework. These models are capable of capturing complex, non-linear relationships that traditional regression may overlook. By comparing these modern importance metrics with earlier measures such as standardized coefficients and Gini importance, we can assess the robustness of our findings and uncover deeper insights into what truly drives customer satisfaction. This enhanced table provides a more holistic view, integrating classical statistical reasoning with modern machine learning interpretability.
🧠 My Interpretation of the Driver Importance Table
To identify which features most influence customer satisfaction, I compared nine potential drivers using a variety of techniques. These included traditional statistical measures like Pearson correlation and standardized regression coefficients, as well as machine learning-based methods like permutation importance, Shapley value approximations (LMG), Johnson’s relative weights, Random Forest Gini importance, and Neural Net permutation scores. Here’s how I interpreted the results:
⸻
🔹 1. Pearson Correlation (%)
These values tell me how strongly each feature correlates with satisfaction on its own. I saw that: • Trust (25.6%), Impact (25.5%), and Service (25.1%) had the strongest linear relationships with satisfaction. • These three features are likely good standalone predictors.
⸻
⚙️ 2. Standardized Coefficients (%)
These reflect the effect of each feature in a multivariate linear regression model. Here: • Impact (15.0%) and Trust (13.6%) came out as top contributors, even after accounting for the presence of other features. • Service (10.4%) was also notably important. • Other variables like Rewarding, Popular, and Build had very low coefficients, which tells me they contribute relatively little when other variables are considered.
⸻
🔄 3. Permutation Importance (%)
This model-agnostic approach shows how much predictive performance drops when a feature is randomly shuffled. • Again, Trust, Impact, and Service rank highest, reinforcing their central role. • Mid-tier features like Easy, Appealing, and Popular are still somewhat useful, but not dominant.
⸻
🧠 4. LMG / Shapley Approximation (%)
LMG values estimate how much each variable contributes to explaining satisfaction, averaged across all possible feature orderings. • Impact (2.4%) and Trust (2.0%) had the largest shares of explanatory power. • Service (1.6%) remained consistently important. • Features like Popular and Differs had very low Shapley contributions, suggesting they don’t add much unique value.
⸻
📊 5. Johnson’s Relative Weights (%)
This method decomposes explained variance using PCA to isolate how much each variable contributes independently. • Impact (40.4%) and Trust (32.8%) absolutely dominated here. • Service (19.1%) also had significant weight. • Other features, especially Rewarding, Popular, and Build, had minimal impact—less than 3%.
⸻
🌳 6. Random Forest Gini (%)
This measures how important each variable is for tree-based splits in the Random Forest model. • Again, Trust (15.6%), Impact (14.1%), and Service (13.0%) stood out. • Gini values were more evenly distributed across remaining features, but still consistent with the pattern.
⸻
🤖 7. Neural Net Permutation Importance (%)
This measures how much performance drops when features are shuffled in a trained neural network. • Service (6.9%), Impact (6.3%), and Trust (6.3%) were the top features. • Even here, nonlinear modeling confirms the dominance of the same three drivers.
⸻
✅ Final Summary
Across all seven methods, three features consistently emerged as the most important: 1. Impact – Highest in regression, Johnson’s weights, and Shapley value. 2. Trust – High across every metric. 3. Service – Always near the top, including in neural networks and random forests.
Other features like Build, Rewarding, and Popular showed only minor influence. This analysis gives me strong confidence that Impact, Trust, and Service should be the key focus areas for improving customer satisfaction.